


How to Create a Wick-Free Candle Gift from Scratch
While candles possess a sense of calm and allure, wax melt burners have their very own set of charms. If you prefer the aesthetic of a ceramic burner with the glow of a tealight and the gentle pool of melted wax, we have a challenge for you.
In this post, we discuss how to create a wick-free scented candle experience using wax melts. In fact, we’re going to make the melts from scratch! This is a perfect gift idea, or simply a crafty activity to pass the time at home, with gorgeous results.
Gather your materials
Here’s what you’ll need to create your wax melts and assemble your kit:
An accurate set of scales: digital scales are excellent when dealing with wax. Because we measure and calculate our materials using weight (as opposed to volume), an accurate reading is important. You want to be able to measure your fragrance liquids down to the gram.
Paraffin or soy wax: the most important ingredient. The EcoSoya Melt Soy Wax (available from Craftovator) is an excellent choice. It pops out of moulds easily and takes on color and scent beautifully. Chances are you’re going to make a few batches to experiment with different fragrances, colours, and methods. So, get yourself a 1 or 2-kg bag of wax to begin with, which will be more than enough.
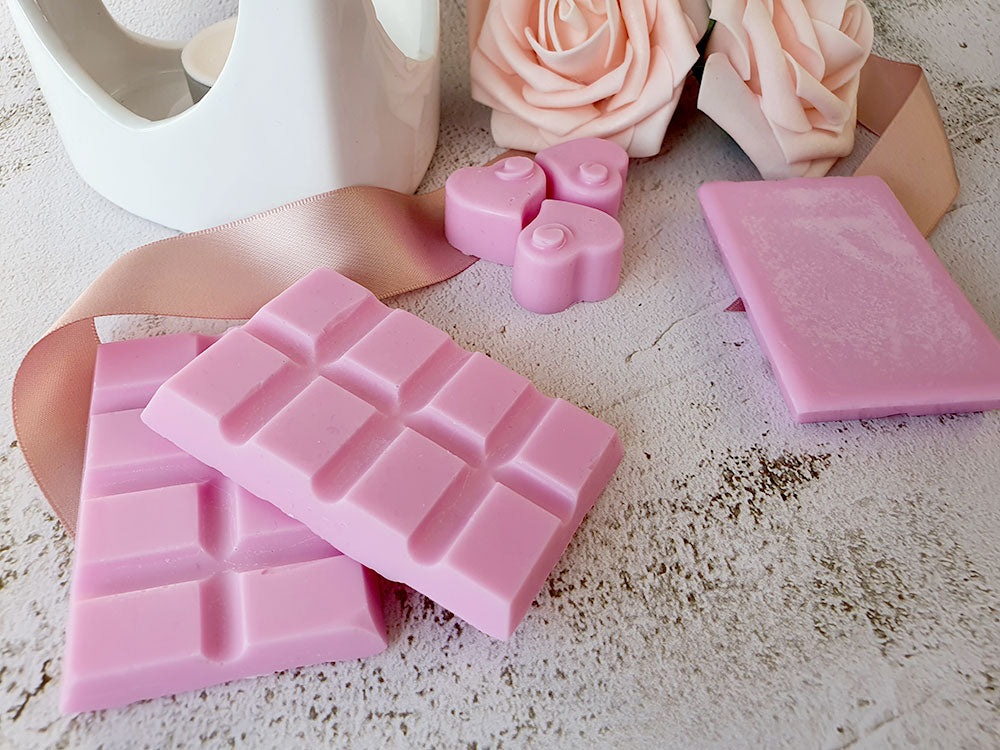
Wax melt clamshells: you can pick up a set of clamshells from the Craftovator for a low cost. This means you can get creative and whimsical with fun shapes such as hearts or stars. Note: keep your clamshells out on the bench before making your wax melts so they can settle into room temperature. This will help to prevent sweating when the wax sets later on.
Fragrance: fragrance oils and essential oils are two very different substances.
Essential oils are rather delicate as they are distilled from natural sources such as flowers and herbs. Heat is a notorious enemy of essential oils, which is why they are stored in dark glass bottles. You can’t simply drop essential oils into your hot wax mixture, as it will degrade and oxidize the oil. You need to use a much larger amount of essential oils to achieve sufficient aroma compared to fragrance oils, making it an expensive project. Plus, essential oils have vastly differing flash points (heat tolerance), making the heating and cooling process rather complex.
However, you can add fragrance oils, as that is what they’re made for! Fragrance oils are synthetic and created to be stable and durable, even when applied to heat.
Colour: this is optional, but you can add dye chips to add aesthetic flair to your melts. Hey, if you’re melting wax and adding fragrance, you may as well pop some pretty hues in the mix, too.
A pot, element, and heat-proof jug: a pouring spout will make the process far easier and tidier. However, it’s completely doable without, just be prepared for a little mess.
Tealights: cheap, easy, safe!
A burner: There are some stunning burners on the market for a low cost.
Create your wax melts
Making your wax melts is incredibly simple, even for beginners. It’s a good idea to start a “trial and error” batch so you can get a feel for the colour and fragrance concentrations. Plus, it will help you to figure out how much wax to use according to how many wax melts you require.
Here’s how to calculate your fragrance ratios and achieve the correct temperatures for successful melts.
- Place a pot over a medium heat and add a little water (about 2 inches)
- Place a heat-proof bowl with a pouring spout on top of the pot, (just like you are melting chocolate or making creme Anglaise). Have a thermometer ready.
- Add the wax to the bowl. If you are using paraffin wax, aim for 85 degrees Celsius (185F). If you are using soy wax, aim for between 43 to 93 degrees Celsius (130F-200F). 85C is a safe temperature to aim for as it means your colour and fragrance will be easily incorporated. Wax that is too hot can discolour and become unstable. Always check the manufacturer's recommended melt temperatures on the wax product page listings.
- If you are using dye chips, add now. Generally, one dye chip will colour about 500 grams of wax, but you can add more or less to achieve the depth you like. Use a metal stirrer to incorporate the dye.
- Now it is time to add your fragrance oils. Check your wax packaging to gauge the fragrance concentration. For example, C-3 soy wax can take a fragrance addition of 7-8% of the wax weight. However, some paraffin wax types can take up to 12%. A good rule of thumb to start with is a 6-8% fragrance load.
Getting the fragrance load right is very important when creating wax melts or candles. When there is a wick involved, for example, a too-high fragrance load can negatively affect the way the wick burns, resulting in an underwhelming flame. Too much fragrance may also cause your wax to sweat and form moisture drops, ruining that smooth and creamy surface we aim for.
Let’s say you are using 500 grams of soy wax and you’d like a 6% fragrance load. Multiply 500 by 0.06 and you will have a 30-gram fragrance amount. Now, minus 30 grams (the fragrance weight) from your 500-gram wax load to reach a total combined weight of 500 grams.
You may be wondering why you wouldn’t simply use millilitres as we are dealing with liquids. Fair question! We deal with weight instead of volume because fragrance oils and waxes have varying densities. If we measured using volume, we may end up with inaccurate amounts and a too-high fragrance load that could discolour and disrupt the quality of your wax.
Depending on the type of wax you're using, many experts recommend adding your fragrance to soy wax at a temperature of 70-75C.
- Get the wax ready for pouring. Allow your wax to reduce in temperature to the recommended pouring temperature. For example, the popular Golden Wax 494 soy wax has a pouring temperature of 140-158F/60-70C. This will help to ensure your wax melts don’t bubble, pucker, frost, or sink in their moulds.
- Now it is time to pour your wax into the clamshells. It is important that the clamshells are room temperature and haven’t been stored in a cooler area. A too-cool mould can lead to moisture formation.
- Leave to cool completely before turning out and using your melts. If you're using paraffin wax, they will be good to use after 24 hours. Some types of soy waxes require a 2-week 'cure time' so check with the wax supplier before using!
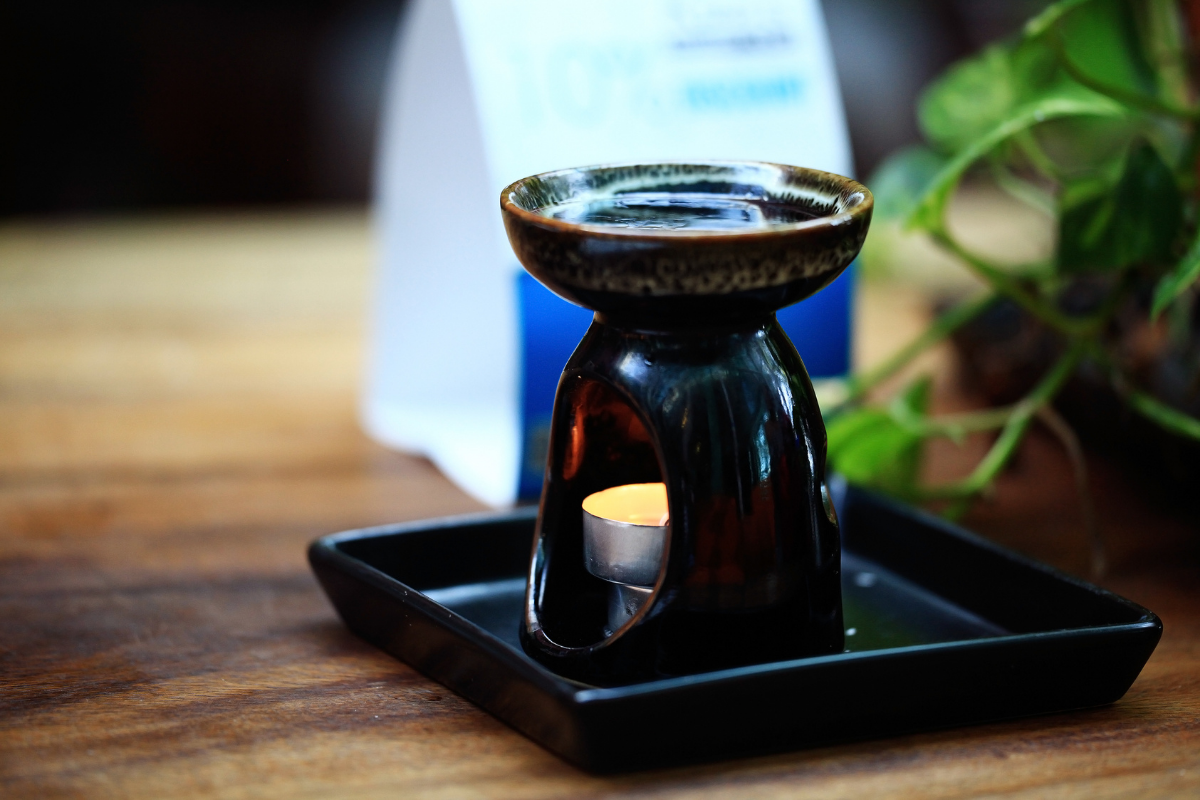
The benefits of wax melts and burners
They are permanent
Unlike candles, wax melt burners are permanent and can become a feature of the room. Yes, the scent and colour may change, but the burner remains! This is not only affordable but it helps to curate a certain aesthetic. For example, a pretty burner can take a plain bathroom from drab to atmospheric.

They are versatile
Your wax burner isn’t going anywhere, nor is your stockpile of tea lights. This means you can create and buy new colours, shapes, and fragrances to your heart’s content. Try lemongrass one day and cinnamon sugar the next.
They’re safer
While candles, when used properly, are nothing to fear, wax melt burners are easier on anxious minds. The tiny tea light sits sturdily within the burner with a far lower risk of being knocked over. For people who are uneasy about burning candles but love the look, aroma, and ritual, wax melts and burners are ideal.
They’re easier to DIY
In many respects, wax melts are far easier to make. For example, you don’t need to secure a wick or work with large vessels of hot wax. Wax melts are an excellent craft idea for beginners, or even for kids (older kids, with supervision, that is!).
They don’t make (as much) mess
I can’t deny it, there is something incredibly satisfying about watching a tall, thick candle melt slowly over an evening. However, dripping wax can be a little irksome to clean. Wax melts and burners don’t give that dramatic, ever-changing effect, but they are tidy and contained.